NetSupport is a software program installed in LeBow computer labs, which allows instructors to monitor each lab computer screen in real-time. In addition to being a helpful instructional tool, NetSupport can also be used to proctor in-person exams in LeBow computer labs.
Please keep in mind that NetSupport can only access LeBow’s lab computers. If you plan to use NetSupport to proctor an exam, students must use a lab computer to complete the assessment and may not use their personal computers during the exam period.
Getting Started with NetSupport
The steps below demonstrate how to begin a session in NetSupport:
- Log into the classroom’s podium computer using your Drexel username and password
- Navigate to Start > Net Support School > NetSupport School Tutor Console
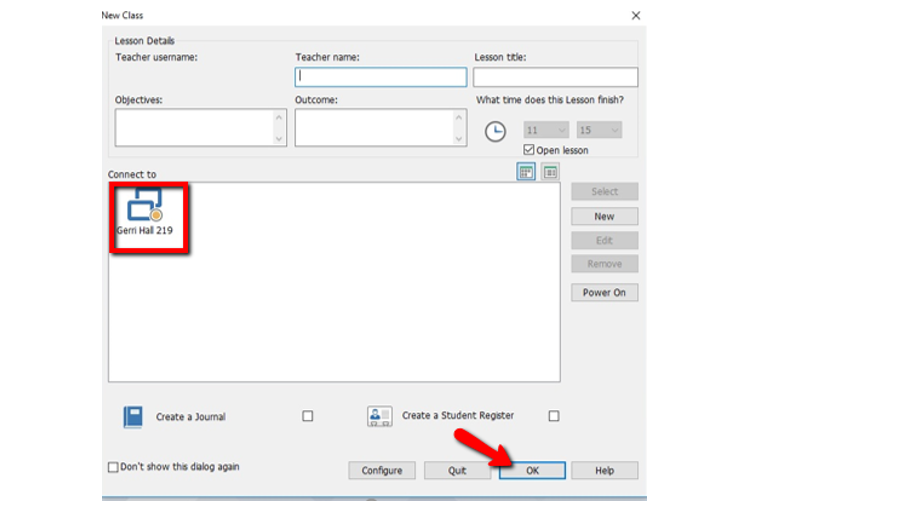
- Once NetSupport loads, a new window will appear with options for deploying NetSupport onto the classroom computers. Do not enter any information: simply select the Connect to icon with your classroom’s name, then click OK to confirm:

- NetSupport will browse the network of lab computers in that classroom, and all connected computers will appear as icons on the app’s main screen. If any of the lab computers appear to be missing, they are likely powered off.
NetSupport Navigation
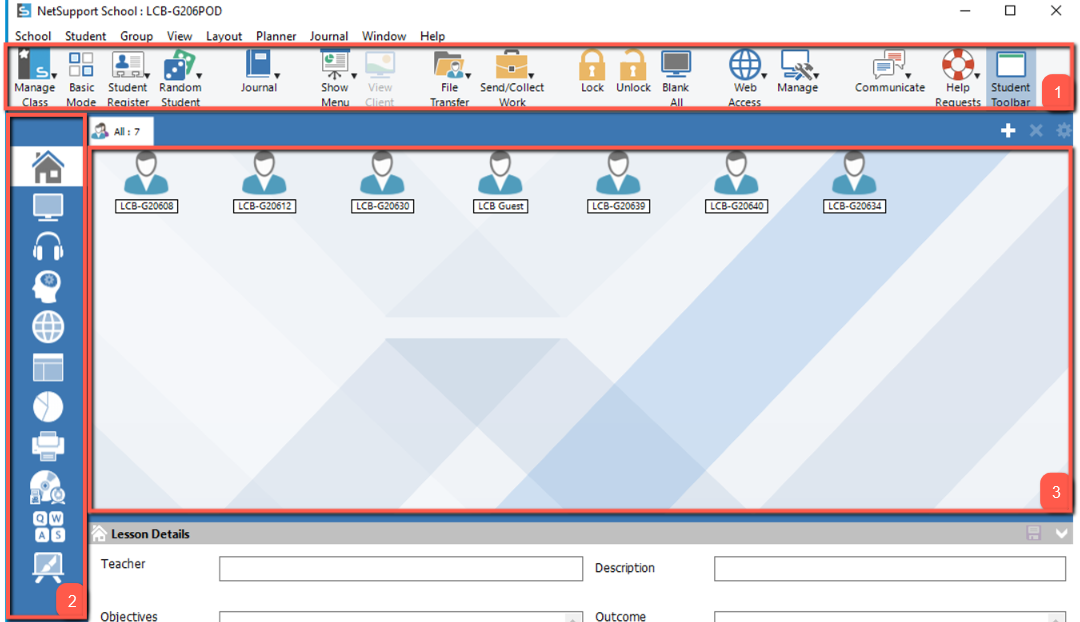
NetSupport is broken into three key areas:

- Toolbar: The toolbar is located across the top of the NetSupport control window, and it contains shortcuts to commonly used tools. Hovering your cursor over any icon in the toolbar will display a description of what that tool does.
- Left-hand navigation: The different tabs along the left-hand navigation will present you with different views of your students’ activities, along with options for allowing and restricting access to digital resources.
- Main screen: Located in the middle of window, the main screen is where student information is displayed.
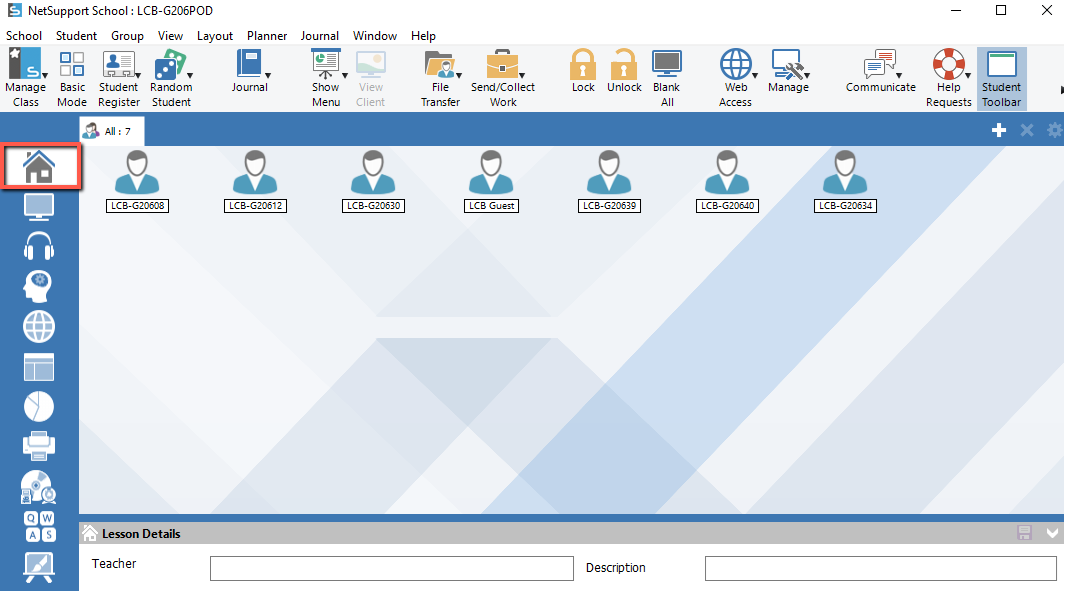
By default, NetSupport will display the Home tab, located in the left-hand navigation bar. This view will provide a list of all active LeBow-owned devices in your classroom.
-
As students begin logging onto the lab computers, their names will appear below each icon on the main screen. If a student is not logged on, the name of the device will display instead:

-
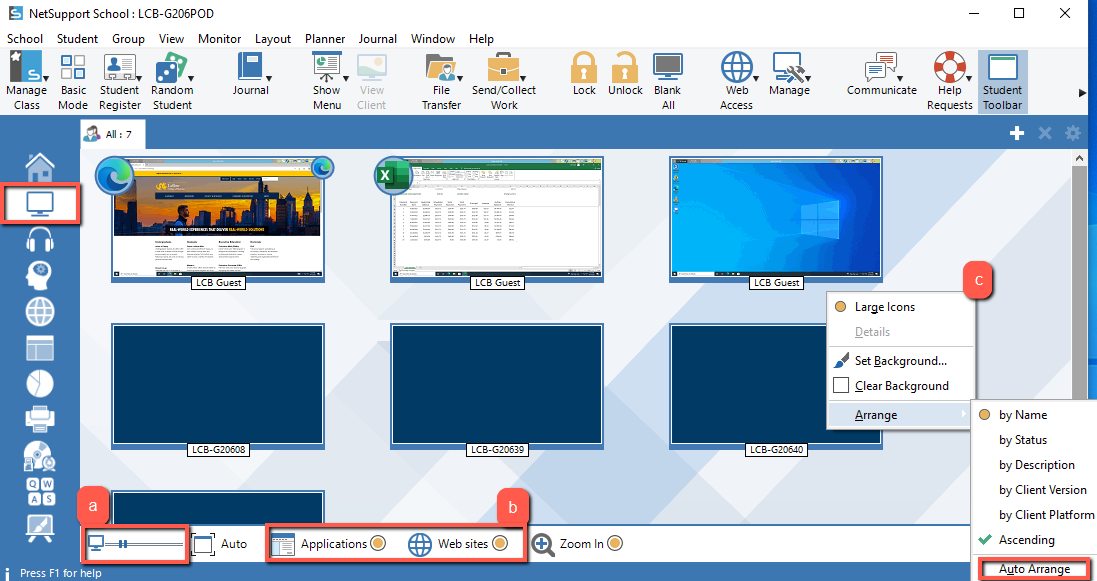
The second tab on the left-hand navigation is the Interactive Monitoring Mode. This is the primary display used for exam proctoring. Interactive Monitoring Mode displays each student’s screen in real-time as a thumbnail associated with the student’s name:

- a. You can zoom in on any student’s screen by hovering your cursor over that student’s thumbnail. The magnifier tool at the bottom of the main screen can be used to increase the size of all thumbnails.
- b. Select the Applications and Websites radio buttons to display any active programs or webpages that a student is using
- c. Right-clicking anywhere in the display window and selecting Auto Arrange will ensure that all students’ thumbnails fit within the display window.
Steps for Proctoring an In-Person Exam
- From the podium computer, select Start > Net Support School > NetSupport School Tutor Console
- From the window that appears, select Connect To > Your Classroom’s Name > OK
- Select the Interactive Monitoring Mode tab to monitor student activity during the exam period
- At the end of the exam period, simply close out of the NetSupport Software to end the session. This will turn off NetSupport’s access to the students’ desktop computers.
The details above offer a basic overview of NetSupport’s key features and demonstrate how NetSupport can be used to monitor student activity during in-person exams. Other useful features are included below:
- Limit which computer applications students can run (e.g. only Excel and Chrome)
- Limit which websites students can visit (e.g. Blackboard Learn or a publisher’s website)
- Limit access to USB flash drives (so students cannot access other materials during the exam)
For more information on NetSupport or these additional features, please contact the Instructional Technology department at 215-895-2314 or lebowintech@drexel.edu.
LeBow has pre-approved exam delivery options for all course modalities. Any other exam approaches should be approved by the Department Head.
If you are interested in creating an online exam in Blackboard, LeBow InTech can save you time by importing the test into Blackboard on your behalf.